Mechanical testing

Comprintmetal3d 5 Equipment 5 Testing 5 Mechanical testing
Within the project, standardized destructive testing is carried out in order to be able to determine corresponding material parameters. For this purpose, we have a testing equipment at the Environmental Campus Birkenfeld and at the University of Luxembourg.

Foreseen tests are

  • Tensile test according to DIN EN ISO 6892
  • Notched bar impact test according to Charpy DIN EN ISO 148-1
  • Fatigue test according to ISO 1099 / ISO 12106
  • Hardness test according to DIN 50133
MTS 20/M two-column machine with spindle drive

Tensile test

An electromechanical universal testing machine is available to perform tensile/compression tests. In the tensile test, a sample with standardized dimensions is loaded rapidly until it breaks. From the measured force and the associated elongation of the sample, the flow curve is determined as the evaluation basis for basic material properties.

Technical data:
MTS 20/M two-column machine with spindle drive
Test force: 100 kN in tensile and compressive direction
Accuracy: 0.5% of the display value or 0.01 of the maximum value
Fine strain measurement for round and flat tensile samples
Accuracy: 0.001 mm resolution at 25 mm path
Automated control, testing and evaluation methods

Location: Umwelt-Campus Birkenfeld

Fatigue test

For highly stressed components, it is of particular importance to consider cyclic loads. Various viscoplastic material models are required for the computational prediction of service life. In order to determine the material parameters of these models, which describe the material behavior under operating conditions, appropriate tests must be carried out un

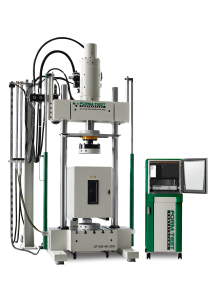
Technical data:Form+Test UP 500 AK-2DH
Static test force: ± 630 kN
dynamic test force: ± 500 kN
Measuring accuracy: Class 0.5 according to DIN EN ISO 7500-1

Location: Universität Luxemburg

Form+Test UP 500 AK-2DH
Source: https://www.formtest.de/en/Products/Machines/UP-500-AK-2DH.php

Notched bar impact test

The toughness of a material is determined in the notched bar impact test. In a pendulum impact tester, a sample with standardized dimensions is deformed or crushed by the pendulum hammer. The work consumed is determined as the difference between the drop and rise angles of the pendulum hammer, considering its mass, and is a measure of the toughness of the material.

Technical data:
AMSLER pendulum impact tester type RKP 450
Max. Impact energy: 450 joules
Impact velocity: 5.23 m/s
Analog circular display with drag pointer
Electromotive lifting device with pendulum hammer release

Location: Umwelt-Campus Birkenfeld

Hardness Testing

The hardness of a material can be determined in a universal hardness testing machine by penetrating a test sample with a defined load into the surface of the sample or component and measuring the depth of penetration. Depending on the shape of the test sample and the type of measurement, various standardized hardness testing methods are used.

Technical data:
INSTRON WOLPERT DIA Tester 722
Force range 1 to 250 kp
Enlargement lenses 70x and 140x
Analog circular display for Rockwell measurement,

Location: Umwelt-Campus Birkenfeld

Prof. Dr. Stefan Trapp

Professor Department of Environmental Planning/Environmental Engineering – Physics and Power Engineering

LOCATION

Birkenfeld | Building 9916 | Room 118

Homepage

Prof. Dr.-Eng. Slawomir Kedziora

Associate Professor – Mechanical Engineering

LOCATION

CAMPUS KIRCHBERG
6, rue Coudenhove-Kalergi
L-1359 Luxembourg